-52, -46, -38, -37, -42; Those are just some of the recent temperatures we have been gifted. As a whole, the winter has been surprisingly gentle. However, when these winter temperatures arrive with little warning, we need to be prepared. This goes a step further than scheduling your thermostat in your home to a few degrees warmer. As a precaution, many people install backup heating in their house in case of these low temperatures, especially if they come alongside a power outage. We recommend having a backup plan in case this situation were to ever arrive. Blowing out your water lines to prevent freezing/rupture would be a good idea if you are unable to warm your home. If you are deciding to add a solid fuel heating device to your home for backup heating, this is what you need to know.
Step 1 – What should I buy or install?
If you are deciding between a fireplace or woodstove, here are some things to note. If you install a zero clearance fireplace (whether it is wood, propane or nat. gas), we do not need to inspect the unit, and it does not add a surcharge to your policy. We do, however, need to be notified that this has been added to increase the replacement cost of your home, and to notify the insurance company that there has been a material change. Any time you make changes to your policy that have been defined as “substantial,” you need to immediately notify your insurance broker as this may increase the risk of insuring your property. If you do not notify the insurance company, this change could potentially VOID your coverage due to the changes.
If you decide to purchase a wood stove, here is some information you’ll need to know.
- The unit must be CSA, ULC or Warnock Hersey approved
- The unit will need to be installed to meet manufacturers specifications
- The unit must sit on a non-combustible floor pad meeting CSA requirements
- If an unapproved unit is being purchased, you must follow B365-17 requirements of an unapproved installation.
- Any wood stove used as auxiliary heat comes with a surcharge that is added to their home insurance. This can range between 10 – 35% of your home insurance premium.
- A high-temp CSA approved chimney is required to be used for the wood stove, meeting manufacturers requirements.
- If you are purchasing a used unit, make sure the unit has been ONLY burning wood. Some people use these units to burn garbage or other items that can cause distress to the integrity of the stove as the burn more inconsistently than wood.
STEP 2 – Installation
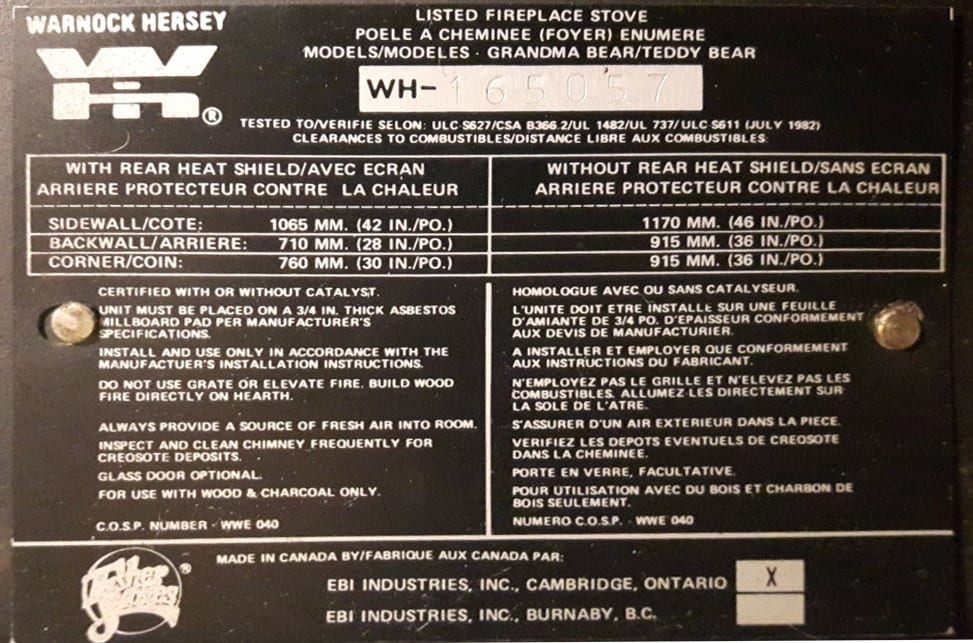
When you install your new or used unit, you need to follow the manufacturer’s guidelines stipulated on the manual of the wood stove. If your unit does not come with a manual, these clearances are indicated on the back of the stove on a steel decal riveted to the stove. NOTE: If the stove does not have that decal on the stove, the unit is NO LONGER CSA approved and you will have to follow the unapproved clearances listed in the B365-17 manual. A example of this decal is shown in the photo below.

If you want your unit WETT inspected, please contact a WETT inspector near you. Lyndon Block in our office is WETT certified and can do that inspection for you. If you have your insurance policy with our brokerage, he will inspect it as a service to you. Otherwise, there is a small charge for the costs incurred to do the inspection. Some things an inspector will look at include:
- Installation of unit, stovepipe and chimney meeting manufacturers requirements
- Stove pipe construction, direction of piping and angle/slope.
- Stove pipe joint security and allowance for flexibility
- How many elbows (max 2 elbows – 180 degrees of change)
- Non-combustible floor pad (construction, clearance)
- Distance to fuel/combustibles
- Wall pass-through & ceiling bucket installation (thimble)
- Chimney clearance above roof and other neighbouring roofs
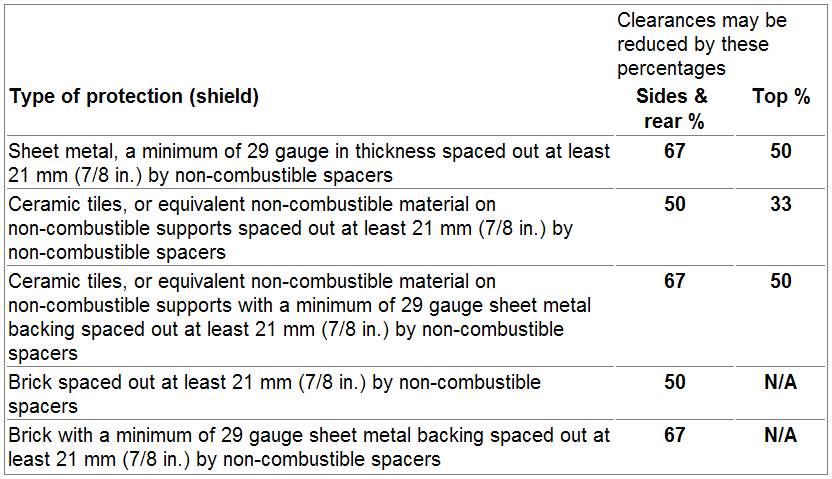
- Installation & material of wall shielding to reduce clearances of stove and stovepipe to combustibles (Diagram below)
Those are the main things, however, every installation and situation can vary, please contact your broker or WETT inspector to find out more information on how to properly install your unit.

STEP 3 – Insurance Approval
To insure the new unit, your insurance broker/company will need to have someone inspect the unit and take photos indicating the clearances and installation matches the requirements indicated by your wood stove manufacturer. Once the company has approved the installation, ONLY THEN are you allowed to start using it. Talk to your broker to see what the insurance company you are currently with charges for having a wood stove installed in your dwelling.
If you are installing a wood stove in your cabin or seasonal cottage, this has very different implications. A surcharge is very rarely applied as this will be used more infrequently, sometimes an inspection is not even required, depending on the company and the situation. Having your broker review some photos is usually a good idea to show the installation and confirm there isn’t any potential fire hazard.
STEP 4 – Using the solid fuel heating device & maintenance
Burning only wood, (particularly seasoned/low moisture wood) helps burn more effectively, giving your home a warmer, cleaner burn. By having a cleaner burn, you reduce the chance of creosote building up in the chimney/stove pipe. It is important to clean the unit and chimney regularly. Having a chimney sweep done before and after the heating season is a good habit to have. Also, DO NOT burn any accelerants, or garbage of any kind in the stove as this will hurt the integrity of the stove and reduce life expectancy of the stove greatly.
There is a lot that goes into installing a solid fuel heating device. A lot of preparation to make sure the unit is a good fit for your home, your home insurance and if you are prepared for the financial implications that come along with it. This may seem like a lot of work and red tape, but there is a reason for everything, and we want you to make sure that the installation of your unit is done properly for you and your family’s safety. Stay warm and stay safe.